Introduction
GeoDjango is the geospatial extension of Django. GeoDjango is an addition to a powerful web development framework that allows spatial data to be integrated into web sites and REST API's. Once the development environment is setup, this powerful tool is easy to learn and work with; however, getting everything working in a Windows 10 environment can sometimes be challenging. If you are a GIS professional/enthusiast like me, you probably have several programs that rely on geospatial libraries like GDAL that are periodically updated to keep up with programs like QGIS. This can lead to issues when developing with Django on the same machine as the python virtual environment can be sensitive to changes in the external GIS libraries.
The following tutorial will guide us through how to setup our development environment so we can start working with spatial data in GeoDjango/Django with the included GDAL and OSGEO python libraries. Hopefully this process will help new users get up and developing with GeoDjango quickly and help existing GeoDjango developers identify problem areas if dependency library errors start occurring after updates.
Overview
Step 1. Install Python
Django/GeoDjango are frameworks based on the Python language, specifically Python 3. If you already have a version of Python 3 installed, you can skip this step, otherwise install the latest stable version of Python 3 for windows here.
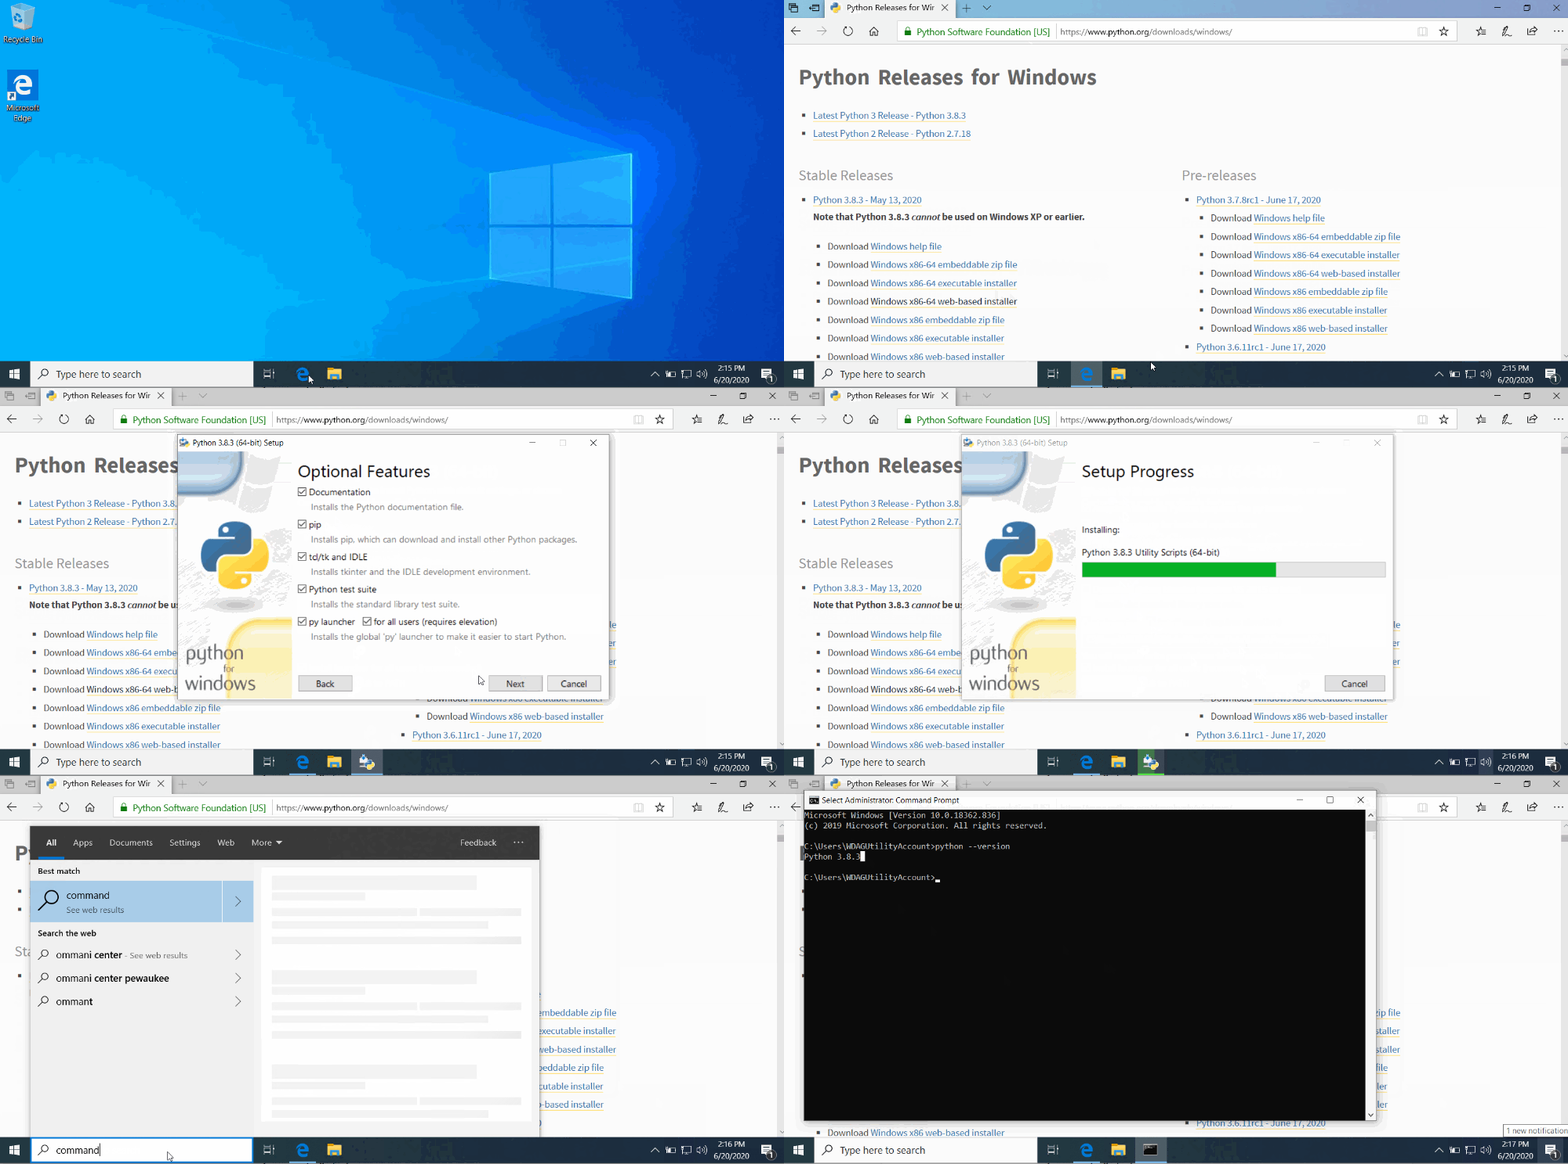
When installing Python, I recommend installing it with the install for all users option selected. This will simplify later steps for setting Windows 10 PATH variables. If your Windows account does not have administration privileges, you will only be able to install it for the account you are currently logged into Windows with. You can still install and use Python, just make sure to note the installation location (i.e. C:\Users\username\AppData\Local\Programs\Python\Python3X).
To install for all users you will have to select the "Customized installation" option. On the next menu be sure to select "pip", "tcl/tl and IDLE", "py launcher" and "for all users (requires elevation)".Click "Next" and on the following menu ensure "Install for all users", "Add Python to environment variables" and "Precompile standard library" are selected.
Step 2. Install OSGeo4W
OSGeo4W or Open Source Geospatial For Windows is a GIS package manager that downloads open source GIS programs and tools and ensures that all of the programs work well together as needed. This is the simplest way to download the libraries needed for GeoDjango.
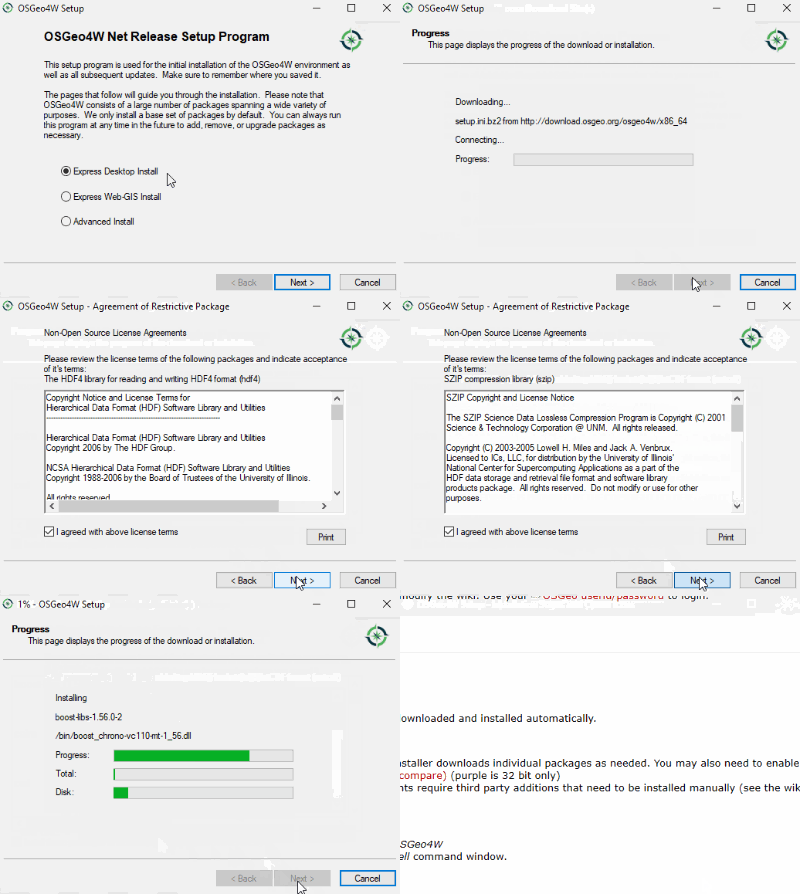
Download the installer from https://trac.osgeo.org/osgeo4w/ and run the OSGeo4W Setup program. Select the Express Web-GIS Install Click "Next", select a download site for the programs (several servers host the data, try to select one that is geographically closest to you), select all of the options in the proceeding menus and agree to the terms of the licenses. The installation process could take a few minutes as there are several programs to download and install. Click finish once the download/installation process is complete.
Step 3. Create Python Virtual Environment
A Python Virtual Environment allows you to use only the libraries you need for a particular application which is good for developers and coding because it allows each project to use different versions of the same library and reduces upgrade and conflict issues.
To keep things simple we will store our virtual environment in a folder/directory named "dev" that is at the top level of the computers drive (i.e. C:\dev). This setup requires most of the operations to be done through the windows command prompt, so simple paths make for less typing errors and less locations to remember. Going forward we will use the command prompt to create folders, install dependencies and programs.
Step 3A. Create dev folder directory
Start by opening windows command prompt by searching for "Command Prompt" or by using the windows key + R command to open the "Run" application, type "cmd" into the Open: line and hit enter.
With the command promp open type cd \ to go to your top level folder. Use the mkdir dev command to create a folder called "dev". This is the location where we will create the python virtual environment and start the GeoDjango application. Now enter into that folder by typing cd dev.
# Windows Command Prompt
C:\Users\username>cd \
C:>mkdir dev
C:>cd dev
C:\dev>
Step 3B. Initiate Virtual Environment
We will now create a Python Virtual Environment named "djangovenv" that is essentially a clone of the basic Python installation where all of the GeoDjango dependencies will be stored.
With the command prompt, starting in the "dev" directory, we will test the Python installation by entering python --version. This will tell us two things. First, an error message will pop up if Python was not properly installed. Second, if the installation is working, it will tell you the version of Python that is installed. If you have other versions of Python (i.e. Python 2.X) you might have to use a different command to invoke python (i.e. python3 --version). If this is the case, use that command to work with python until we enter into the virtual environment.
Now initiate the virtual environment by entering python -m venv djangoenv. It may take a minute for the environment to set up. Once the command is finished running enter djangovenv\Scripts\activate.bat. "(djangovenv)" should now be showing in brackets at the beginning of the current command line, indicating that your virtual environment is now active.
# Windows Command Prompt
C:\dev>python --version
Python 3.8.4rc1
C:\dev>python -m venv djangoenv
C:\dev>djangovenv\Scripts\activate.bat
(djangovenv) C:\dev>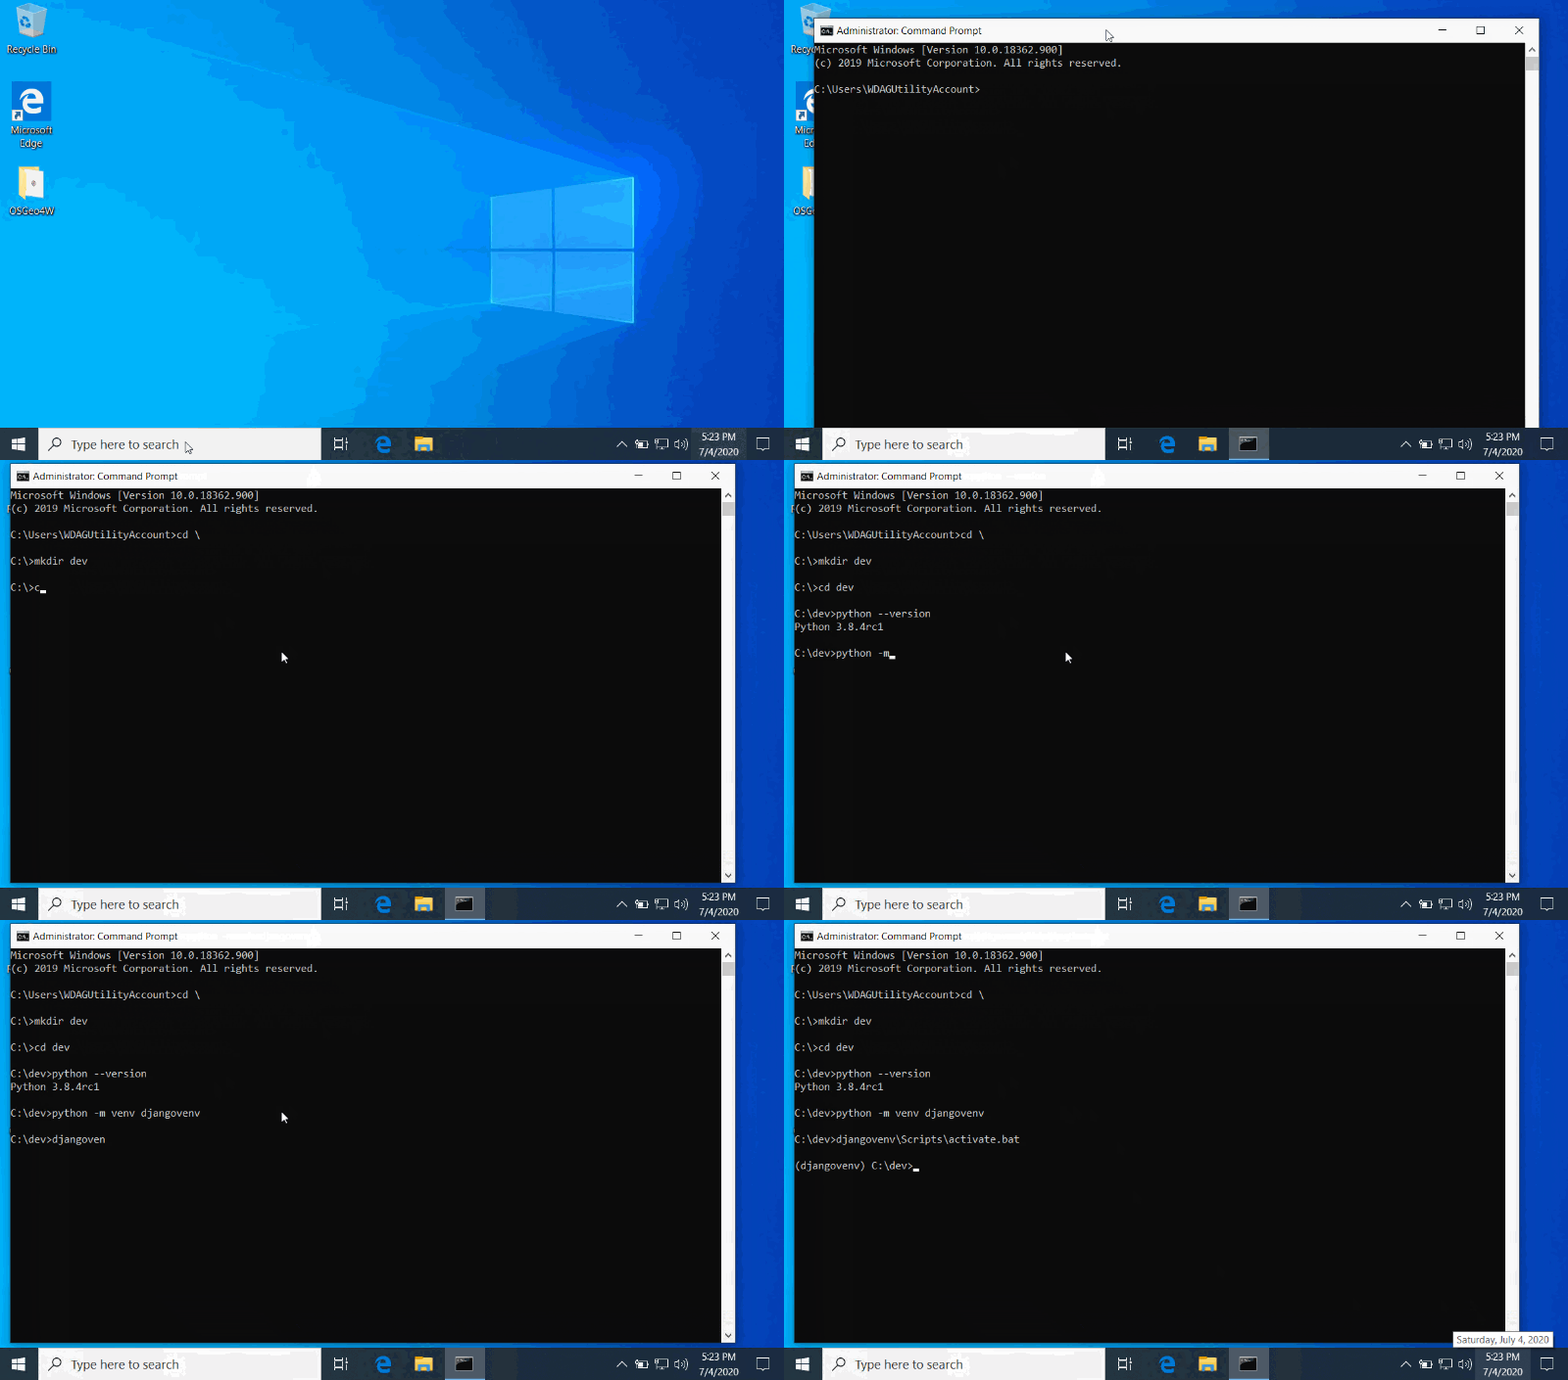
Step 4. Install Django
Now that Python is verified to be working and we have a new virtual environment initiated and activated for GeoDjango, we can start installing all of the Python packages required to run GeoDjango using the pip command that allows us to easily install packages from the Python Package Index repository.
At this point you should still have your "djangovenv" Python virtual environment active, if not refer to the previous step for the activation command. We are now going to install the Django package using the following pip command: pip install django.
The pip installer will now download and install the most recent release of Django as a python package that can be run out of the "djangovenv" virtual environment. You can run the command pip list to which packages are installed in the virtual environment and run django-admin to verify that Django is installed.
# Windows Command Prompt
(djangovenv) C:\dev>pip install django
Collecting django
  Downloading Django-3.0.8-py3-none-any.whl (7.5 MB)
     |████████████████████████████████| 7.5 MB 6.8 MB/s
Collecting asgiref~=3.2
  Downloading asgiref-3.2.10-py3-none-any.whl (19 kB)
Collecting sqlparse>=0.2.2
  Downloading sqlparse-0.3.1-py2.py3-none-any.whl (40 kB)
     |████████████████████████████████| 40 kB 2.5 MB/s
Collecting pytz
  Downloading pytz-2020.1-py2.py3-none-any.whl (510 kB)
     |████████████████████████████████| 510 kB 3.3 MB/s
Installing collected packages: asgiref, sqlparse, pytz, django
Successfully installed asgiref-3.2.10 django-3.0.8 pytz-2020.1 sqlparse-0.3.1
(djangovenv) C:\dev>pip list
Package    Version
---------- -------
asgiref    3.2.10
Django     3.0.8
pip        20.1.1
pytz       2020.1
setuptools 47.1.0
sqlparse   0.3.1
(djangovenv) C:\dev>django-admin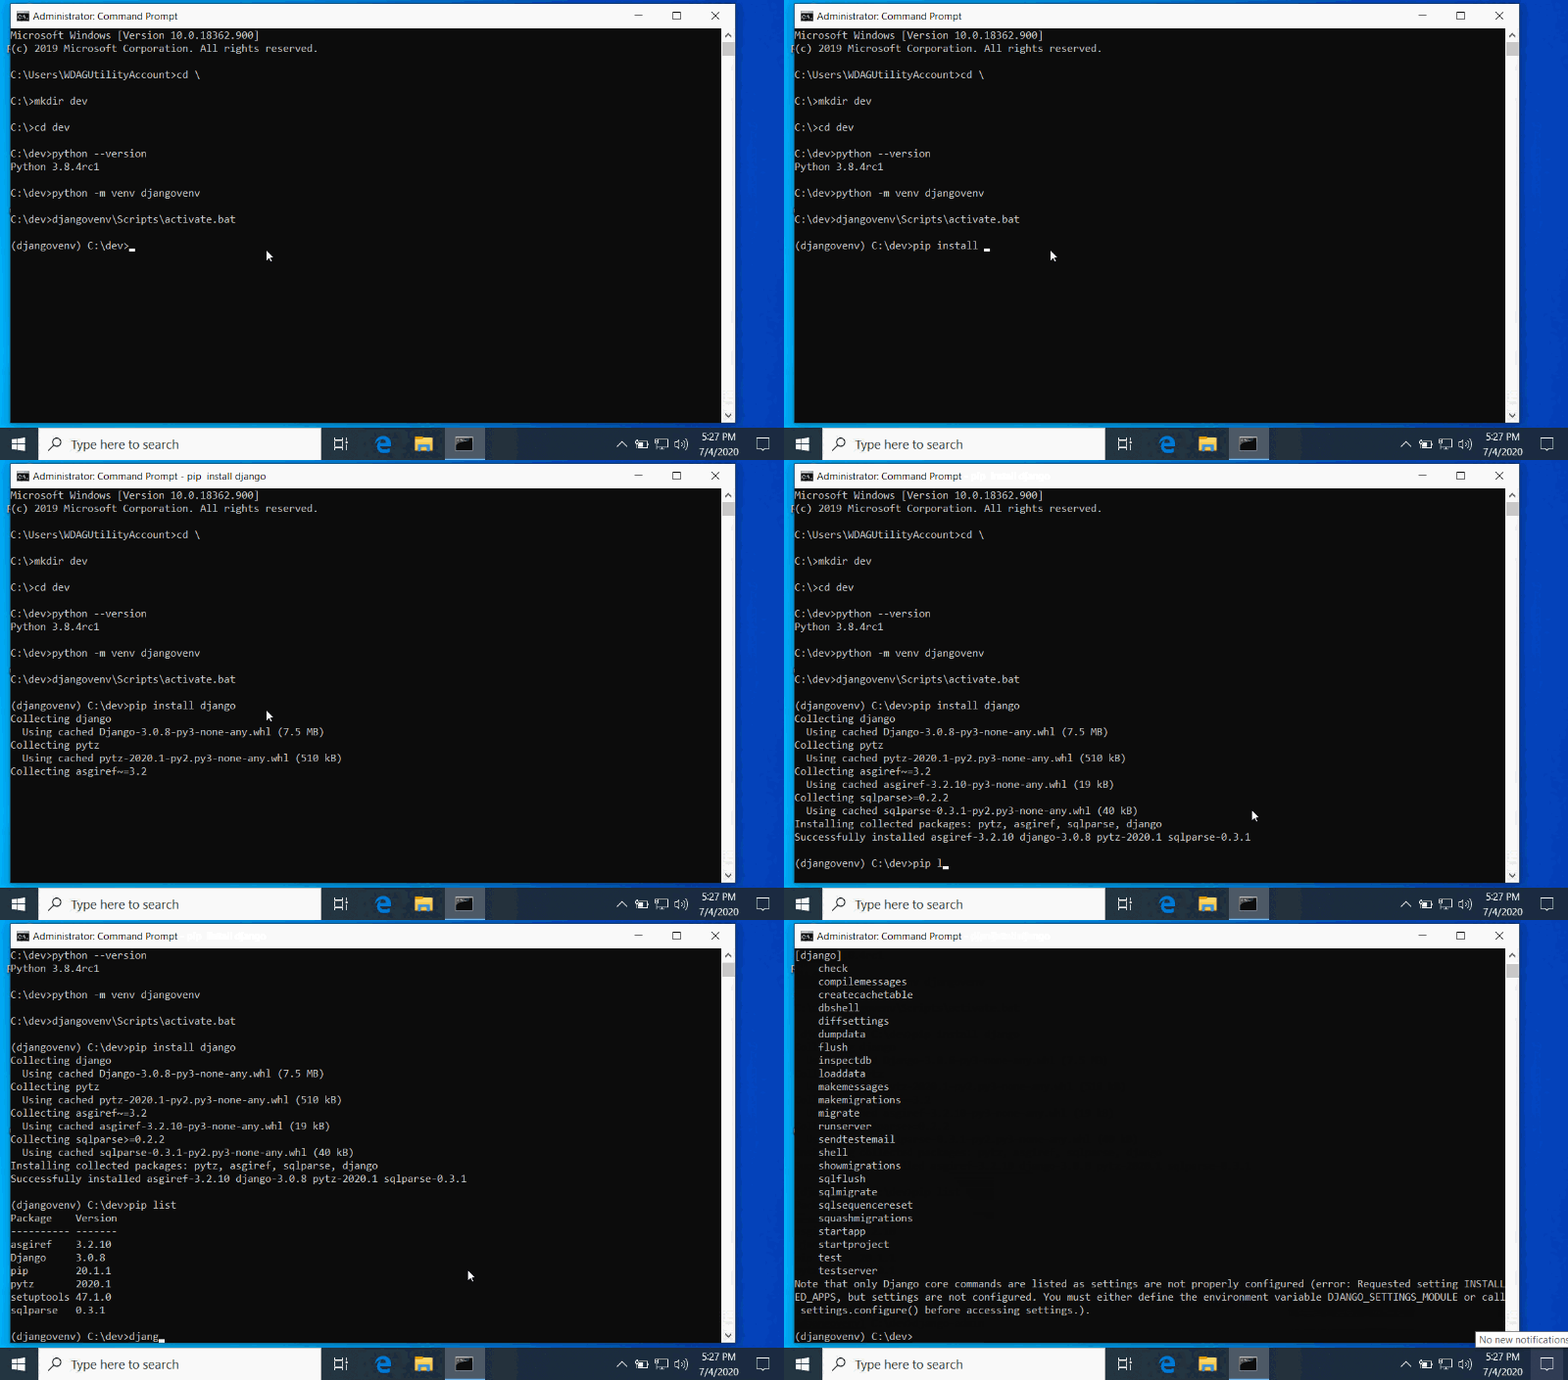
Step 5. Install GDAL for Python
Now that the virtual environment and Django are ready, we can now bring in the Geospatial Data Abstraction Library (GDAL) for Python.
The most consistent way to do this is by downloading the PIP Wheel (.whl) file for your version of Python from Christoph Gohlke's Unofficial Windows Binaries for Python Extension Packages site (you may be tempted to use pip install GDAL; however, from my past experience this is unlikely going to work. Be sure to download the .whl file that matches your Python version (i.e., Python 3.7, Windows 64-Bit => GDAL‑3.1.2‑cp37‑cp37m‑win_amd64.whl, Python 3.8, Windows 64-Bit => GDAL‑3.1.2‑cp38‑cp38‑win_amd64.whl).
To keep things simple, move the downloaded .whl file to your dev folder for easier command prompt access and for future reference. Using the command prompt with the virtual environment activated use pip to install the .whl
pip install GDAL‑3.X.X‑cp3X‑cp3X‑win_amd64.whl
or
pip install C:/path/to/GDAL‑3.X.X‑cp3X‑cp3X‑win_amd64.whl
GDAL libraries should now be accessible through your Python virtual environment command prompt. You can test them by activating the Python terminal with the command prompt
python
The python command prompt is now active, test that the gdal libraries are accessible by entering
import gdal
import ogr
exit()
If no import errors are present you can start programming with GDAL python!
#Use the following commands to install the GDAL from the downloaded .whl file
(djangovenv) C:\dev>dir
05/23/2020  10:42 AM    <DIR>          .
05/23/2020  10:42 AM    <DIR>          ..
05/23/2020  10:42 AM    <DIR>          djangovenv
05/23/2020  10:42 AM    <DIR>          GDAL‑3.1.2‑cp38‑cp38‑win_amd64.whl
(djangovenv) C:\dev>pip install GDAL‑3.1.2‑cp38‑cp38‑win_amd64.whl
Processing c:\dev\gdal-3.1.2-cp38-cp38-win_amd64.whl
Installing collected packages: GDAL
Successfully installed GDAL-3.1.2
(djangovenv) C:\dev>python
Python 3.8.4 (tags/v3.8.4:d7c567b08f, Mar 10 2020, 10:41:24) [MSC v.1900 64 bit (AMD64)] on win32
Type "help", "copyright", "credits" or "license" for more information
>>>import gdal
>>>import ogr
>>>exit()
(djangovenv) C:\dev>
Step 6. Create Django Project
We are now going to create a new Django project that will create a settings.py file that we will have to update to ensure GDAL is working properly with Django and will give us a platform to test GDAL and Django in a Django Environment.
It is very easy to start a Django project. With the Python virtual environment "djangovenv" active in the command prompt, enter django-admin start project geodjango. You can use any project name you like in place of geodjango. This will create a basic Django project folder and file structure that will allow you to start building up a Django application. Importantly, in the first level of the project, there is a python file named manage.py. By activating this file with the virtual environment we can issue commands to the Django application for development and testing. We will now use the command prompt cd geodjango to enter into the upper level of this project directory.
# Windows Command Prompt
# Start Django Project
(djangovenv) C:\dev>django-admin startproject geodjango
# Move into project directory
(djangovenv) C:\dev>cd geodjango
(djangovenv) C:\dev\geodjango>
Step 7. GeoDjango BAT (Batch) File
Before we carry on into modifying the GeoDjango code, we need to let the Windows system know where to access the GDAL program by setting the PATH variables. Otherwise, Django/Python will not be able to find the correct location to execute the GDAL programs/binaries from.
We are going to create a .bat file that is essentially a list of command prompts that will all run sequentially instead of having to enter them in line by line. BAT files are good because they allow us to minimize entry errors.
In our geodjango project/folder/directory (or the name of the geodjango project you created, we will use the Windows Explorer file browser to navigate to the C:\dev\geodjango folder, right click with the mouse and create a new text file called geodjango_setup. Right click on the geodjango.txt file and change the file extension to .bat. Follow these instructions if you are unsure how to change or view the file extensions of your documents.
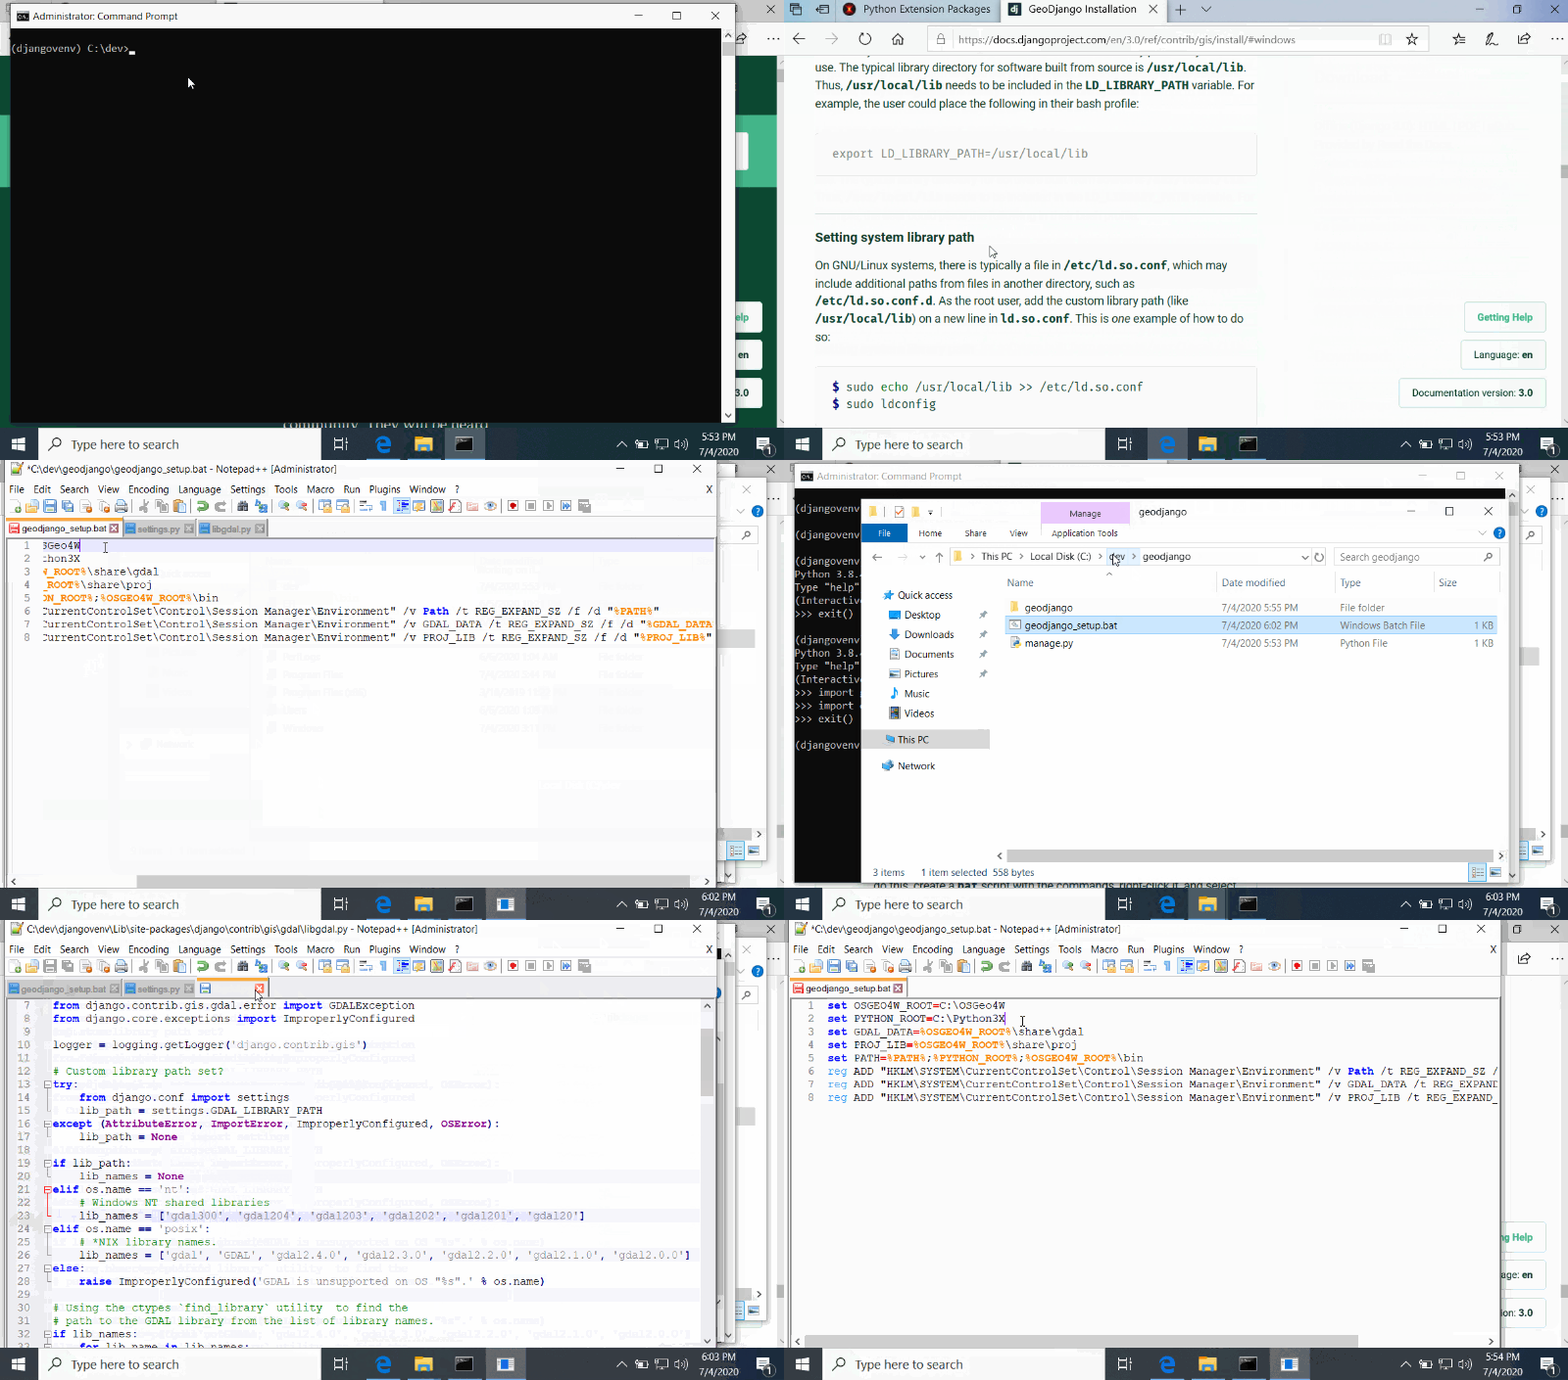
Open the geodjango_setup.bat file with your favorite text editor, such as Windows built in Notepad or my favorite Notepad++ and copy the code snippet from the Official GeoDjango Documentation or from the example below. You may have to change line 1 from set OSGEO4W_ROOT=C:\OSGeo4W to set OSGEO4W_ROOT=C:\OSGeo4W64, if you have a Windows 64-bit system. You will also have to change the python version in line 2 from set PYTHON_ROOT=C:\Python3X to whatever version of python 3 you have installed, such as set PYTHON_ROOT=C:\Python38 (see animation below where I find the versions of OSGEO installed and Python installed and adjust the settings accordingly).
set OSGEO4W_ROOT=C:\OSGeo4W
set PYTHON_ROOT=C:\Python3X
set GDAL_DATA=%OSGEO4W_ROOT%\share\gdal
set PROJ_LIB=%OSGEO4W_ROOT%\share\proj
set PATH=%PATH%;%PYTHON_ROOT%;%OSGEO4W_ROOT%\bin
reg ADD "HKLM\SYSTEM\CurrentControlSet\Control\Session Manager\Environment" /v Path /t REG_EXPAND_SZ /f /d "%PATH%"
reg ADD "HKLM\SYSTEM\CurrentControlSet\Control\Session Manager\Environment" /v GDAL_DATA /t REG_EXPAND_SZ /f /d "%GDAL_DATA%"
reg ADD "HKLM\SYSTEM\CurrentControlSet\Control\Session Manager\Environment" /v PROJ_LIB /t REG_EXPAND_SZ /f /d "%PROJ_LIB%"
You can see in my example that the .bat file reflects my OSGEO_ROOT is the install location C:\OSGeo4W64 because it is installed as the 64-bit version and my PYTHON_ROOT is C:\Program Files\Python38 because Python 3.8.4 is installed.
We will now run the geodjango_setup.bat file by double clicking on it or right clicking on it and then selecting run. It will only take a second for it complete, thus updating your Windows PATH settings so GeoDjango knows where to look to make GDAL and Python work together.
Step 8. Django settings.py
The Django settings.py file is where all of the key application and environment settings are for a Django application. In this example the file would be located at C:\dev\geodjango\geodjango\settings.py. We are going to have to add some code to the start of this file to tell Django where to look for our Python GDAL files when the program runs.
Open the settings.py file with a text editor (i.e., Notepad++) and add the following code after BASE_DIR = os.path.dirname(os.path.dirname(os.path.abspath(__file__)))
# settings.py file
import os

BASE_DIR = os.path.dirname(os.path.dirname(os.path.abspath(__file__)))

# use this if setting up on Windows 10 with GDAL installed from OSGeo4W using defaults
if os.name == 'nt':
    VIRTUAL_ENV_BASE = os.environ['VIRTUAL_ENV']
    os.environ['PATH'] = os.path.join(VIRTUAL_ENV_BASE, r'.\Lib\site-packages\osgeo') + ';' + os.environ['PATH']
    os.environ['PROJ_LIB'] = os.path.join(VIRTUAL_ENV_BASE, r'.\Lib\site-packages\osgeo\data\proj') + ';' + os.environ['PATH']

#[...] settings.py code continues
Step 9. Update Django GDAL (libgdal.py) File
The last file we need to modify in order to get the GDAL bindings to work reliably is the libgdal.py file. This is one of Django's core files, so we will have to be careful here!
Essentially what we are doing here is telling Django to look for the proper GDAL library binding file (.dll) that was packaged in the files from GDAL pip wheel. This enables Django to use GDAL functions.
Using a text editor we are going to modify line 23 of Django's libgdal.py file that is located in the virtual environment's files. In this example the file is located here: C:\dev\djangovenv\Lib\site-packages\django\contrib\gis\gdal\libgdal.py. For the version of python we have installed, we will add 'gdal300' to the beginning of the lib_names array as such:
# C:\dev\djangovenv\Lib\site-packages\django\contrib\gis\gdal\libgdal.py
# [...]
# Line 21
elif os.name == 'nt':
    # Windows NT shared libraries
    lib_names = ['gdal300', 'gdal204', 'gdal203', 'gdal202', 'gdal201', 'gdal20']
The value we added to this array references the .dll file, this can change with versions of python/GDAL. The name of this file can be verified by looking at the .dll files in the virtual environment here: C:\dev\djangovenv\Lib\site-packages\osgeo. In this example case there is a .dll file in there named gdal300.dll. Django will look for this file based on the array from above and throw an error if it can not find a .dll file from that list.
Step 10. Test
Finally, the last step is to ensure Django can work with GDAL. Ensure that your virtual environment is activated and you are in the root level of your Django project (i.e., C:\dev\geodjango) and then activate the Django shell with the command python manage.py shell. Then enter the commands as per the snippets below.
# windows command prompt
(djangovenv) C:\dev\geodjango>python manage.py shell
Python 3.8.4 (tags/v3.8.4:d7c567b08f, Mar 10 2020, 10:41:24) [MSC v.1900 64 bit (AMD64)] on win32
Type "help", "copyright", "credits" or "license" for more information.
(InteractiveConsole)
>>>import gdal
>>>import ogr
>>>exit()
(djangovenv) C:\dev\geodjango>
If all the imports from above work, you are ready to start working with Django and GDAL!
On July 23, 2021, 11:21 a.m. meguh78 says:
This is great, I feel validated now, having had so many problems trying to install on Windows!
On April 19, 2022, 3:20 a.m. strongchoo2013@gmail.com says:
I have struggled with this GDAL configuration for some time in order to complete my location-based application. This article just did the trick in few minutes. Thanks so much